
FAQ
Frequently Asked Questions
Here you’ll find concise answers to the most common questions about your idworx bike. If you need further assistance, you can contact us using the button below. We’ll be glad to support you.
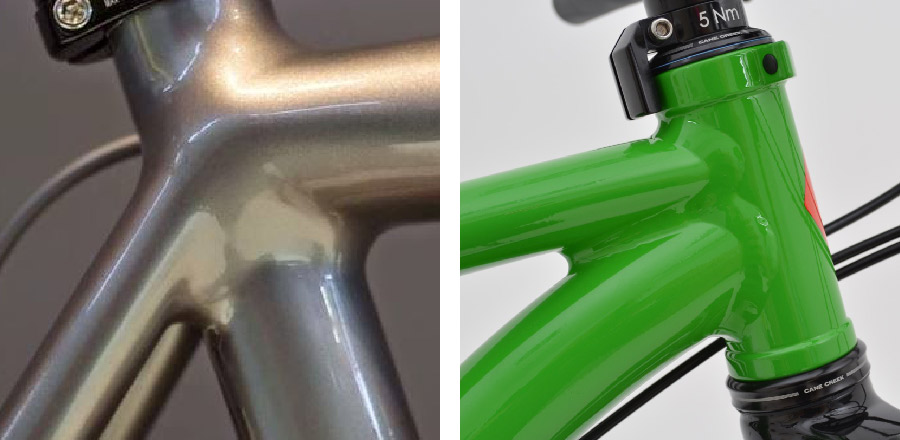
The left photo shows the weld seam of a frame which has been mechanically machined after welding, in order to achieve an optically as smooth and seamless connection as possible. For this purpose, the finished weld seam is worked with a so-called finger grinder, often referred to as ‘power file’. During this process, material is removed. Despite the progress of automation, this is a real craft that requires a lot of workmanship and accuracy. The challenge is to realize the desired perfect and complex shape, while on the other hand avoiding accidentally removing more material than intended or possibly even removing material from the welded tubes.
However, even if no mistakes are made, this type of ground-over welded seam is a weakening of the frame. This is clearly demonstrated by fatigue tests run in a lab to find out when and where frames fail when treated to repeated loads.
Material scientists explain those failures like that: The material structure that is formed when welding seam cools down from its liquid state, is ’opened’ by the grinding. As a result, microcracks can occur along the so-called grain boundaries in the material. This happens under load, directly under the surface of the sanded weld seam, which can lead to larger cracks.
Welding and materials scientists therefore consider such a machined weld as a weak point. However, many frame manufacturers still work in this way, often although they are aware of the disadvantages, in order to increase the aesthetic attractiveness of their frames.
For idworx, such an approach is out of the question. We set other priorities for our products. Of course we try to offer the best possible frames, but we value service life, functionality and weight higher than the aesthetical appearance.
Therefore, idworx frames are welded using the so-called ‘Smooth-Weld’ technique, as shown in the photo on the right. Another weld seam is applied over the actual welding seam, which connects the tubes. For this visible welding seam, a different welding filler material is used which, when the weld seam is solidified, creates a surface which is as smooth as possible without the scaly structure which is so typical in welding. Although you can see and feel the weld seam, it’s also smooth and most customers prefer it. In addition, this smoother surface, which is not produced by
grinding, also has advantages over a machined weld seam in terms of durability.
The additional heat applied to the frame during the application of this second weld seam has no negative effect on the durability of the frame, since the structure in the heat-affected zone of the weld seam can recover during the absolutely necessary
T6 heat treatment of any welded (and aligned) aluminum frame.
For our bicycles equipped with a Pinion gearbox, unlike our Rohloff bikes, we cannot use an eccentrically adjustable bottom bracket to set the chain or belt tension. Therefore, we developed our idworx Adjustable Synchronised Dropouts, or iASD for short. They are very robust, easy to handle, and reliable in their function.
No threads in the frame or dropout
A thread can always be damaged through improper handling—especially threads in aluminum. Therefore, we use a nut plate made of high-strength stainless steel that can be replaced if it becomes damaged.
To adjust the chain tension, the actual dropout must move relative to the frame. For this movement we use an adjustment screw, which allows the tension to be set precisely. This screw is mounted in a replaceable bushing.
Precise and highly load-resistant
On many frames with sliding dropouts, the contact area with the frame is small. This can lead to deformation because the fastening bolts must be tightened very strongly to prevent the dropouts from shifting due to chain force.
Our design addresses this risk with a contact surface that we intentionally made as large as possible.
We also use high-strength M8 clamping bolts that can withstand the high required tightening torque. Depending on the gear selected on the Pinion gearbox, extremely high chain forces can occur, which the adjustable dropouts must be able to withstand.
For this reason, these clamping bolts are not made of stainless steel but of a high-strength steel alloy. They are protected against corrosion by zinc plating, since stainless steels typically used for bolts do not provide sufficient strength.
Easy handling
When adjusting chain tension using sliding dropouts, it is usually necessary to ensure that the rear wheel remains aligned with the frame and is not clamped at an angle in the rear triangle.
With our synchronized sliding dropout design, this risk does not exist.
Please be sure to keep the thru-axle—which secures the rear wheel in the frame—firmly tightened. Loosen the clamping bolts of the dropouts on both sides and then adjust the chain tension using the adjustment screw. Then retighten the two clamping bolts of the drivetrain-side dropout first, and finally the clamping bolts on the other side. Done! The rear wheel sits centered, and the brake adjustment remains unchanged.
Trustworthy
The entire construction is optimized for maximum reliability and durability. Should a component ever be damaged due to (very) improper handling, it can easily be replaced.
Efficient
With our design, chain or belt tension can be adjusted extremely precisely. Thanks to the exceptionally stiff rear triangle of our Pinion bikes, the tension hardly fluctuates while riding. This means you do not need to set the tension unnecessarily high—just high enough.
Unlike systems that use a spring-loaded chain or belt tensioner, this reduces friction losses in the chain or belt drive.
For several years, we have used a plastic reducing sleeve (called a shim) in our idworx bicycles, which we glue into the seat tube of the frame. This shim combines several advantages in a single component.
It effectively prevents corrosion between the seatpost and the seat tube, which would normally be achieved by using grease. The surface of the seatpost is protected from damage, and it effectively eliminates creaking noises because the seatpost sits in the frame without play.
Please do NOT use grease when inserting the seatpost!
First, it is not necessary for corrosion protection, and second, the grease drastically reduces the friction between the seatpost and the shim.
To prevent the seatpost from slipping down into the seat tube during riding, the seat clamp would then have to be tightened with excessively high torque. In extreme cases, this can lead to damage to the frame.
These two measurements were introduced to allow a quick assessment—when comparing bicycle frames from different manufacturers—of whether the handlebar position on a frame tends toward a more comfortable or a more sporty setup.
“More comfortable” (= lower reach value) means that, with the same stem length, the handlebar is positioned at a smaller horizontal distance from the saddle. Conversely, “more sporty” (= larger reach value) means the handlebar is positioned farther away.
By definition, however, a comparison of reach values is only valid if the stack value is identical or differs by only a few millimeters.
If you work with stack and reach measurements, you must first select the frame size of a model whose stack value allows you to set the handlebar height you need.
As a rule, this limits your choice to exactly one frame size for a given model.
If (in exceptional cases) your desired handlebar height can be achieved on two frame sizes of the same model, the larger of the two frames will always be the longer one. This applies to all frame manufacturers. Anything else would be absurd.
When comparing two frames whose stack values differ, the following rule applies:
For every 10 mm by which the stack value of one frame is smaller than that of the other frame, you must subtract almost exactly 3 mm from its reach value in order to compare the reach values of the two frames.
If you do not make this correction, comparing reach values will inevitably lead to an incorrect assessment.
Example: idworx AllRohler, comparison of frame sizes XL (60) and XXL (64).
Stack XL: 672 mm, XXL: 712 mm
Reach XL: 410 mm, XXL: 410 mm
Difference in stack values: 40 mm. The correction value for reach is therefore 4 × 3 mm = 12 mm.
Thus, the XXL frame (410 mm reach) is 12 mm longer than the XL frame when the handlebar height is the same (410 mm reach minus 12 mm). On the XL frame you would therefore need to choose a stem that is 12 mm longer to position the handlebar at the same horizontal distance from the saddle as on the XXL frame.
| ER / OR / AR | Weber E-Kupplung | Eventuell muss die Kupplung etwas angepasst werden. |
| ER / OR / AR / oP / oPti / PR | Weber EP-Kupplung mit Adapter |
|
| Follow manufacturer instructions | If specified, or in case of uncertainty, have the work carried out by an idworx dealer. |
| At least once a year or every 2.000 km | Have it carried out by an idworx dealer. |
If you transport your idworx trekking bike with your car, we recommend securing the rear part of the fender to the wheel using a rubber band or a strap. This prevents air turbulence from damaging your fender.
Experience-based data subject to reservation!
| AR / oP / oP eT (without chain case) | Ca. 3.000 – 10.000 km |
| AR (with chain case) | Ca. 5.000 – 15.000 km |
| oP / oP eT (with chain case) | Ca. 4.000 – 12.000 km |
| Mountainbikes: | Ca. 2.000 – 10.000 km |
| Grandone: | Ca. 2.000 – 5.000 km |
Use regular chain oil such as Rohloff-chain-oil that is specific to bicycles. Do not use teflon, wax or silicone oil! If you do want to use it, always use an oil with these additives!
Lube regularly but not too much. For precise details ask your idworx dealer.
Regularly remove dirt and grime using warm water and dish soap or a bike cleaner.
Regularly protect with appropriate products from your idworx dealer’s bike care range, such as paint and corrosion protection sealants.
Proper care of a high-quality bicycle always includes regular cleaning and sealing with suitable maintenance products. No bike manufacturer can guarantee that a bicycle or its components will not corrode without proper care—except for parts made entirely of titanium.
If brake pads are glazed or contaminated with oil, they must be replaced. Other possibilities are to degrease the brake rotor, check the alignment of the brake caliper, and bed in the brakes in a controlled manner. These services should be performed by an idworx dealer.
It is normal for disc brakes to squeal at the beginning of braking when the rotor is wet or in rainy conditions—this affects most bicycle disc brakes. Currently, we do not have a definitive solution for this. If the squealing is very pronounced, it may help to experiment with different brake pads or use a disc brake silencer spray (such as those from SwissStop).
Vibrations during braking are normal to some extent, as every brake rotor has slight thickness variations. If the vibrations become so strong that the wheel or handlebars can no longer be controlled, the bike should be inspected by an idworx dealer.
If the headset has play, the brake rotor is partially contaminated, unevenly worn, or has variations in width, visit your idworx dealer.
Rattling noises when riding over uneven surfaces (cobblestones or rough roads in general) can have several causes:
-
Chain too loose – Tension the chain; this may be necessary every 500 km, but at a minimum every 2,000 km.
-
Chainring/crank touches the chain case – This happens if the chainstay clamp screw was not loosened when adjusting the chain.
-
Bottom bracket disc in the chain case is too loose – Have this repaired by your idworx dealer.
The chain case is misaligned, for example after the bike has fallen over. Realign the chain case at the rear end, near the chainstay clamp. If necessary, have this done by your idworx dealer.
If the bike wobbles while riding with luggage, it is usually due to unfavorable or overly heavy loading, for example on Comfort frame models. To correct this, concentrate the weight toward the rear and lower on the bike, and keep the handlebar bag loaded to a maximum of 1 kg. As a tip, consider using a trailer.
Unfavorable weight distribution caused by upright sitting and/or luggage should be avoided, as it usually is not permitted anyways.
If components on your bike are loose or poorly lubricated, several issues may arise. Do not use non-original idworx quick-release axles (e.g., Pit Lock); always use idworx quick-release skewers. If the hub quick-release skewers are too loose, they must be correctly mounted and, if necessary, adjusted by a professional workshop.
If the eccentric or bottom bracket is poorly greased or loose, remove, clean, and reassemble the eccentric and all bolts—including washers—using suitable grease, and tighten all bolts to the correct torque. This should also be done by a professional workshop.
The same procedure applies to any other components that are loose or poorly lubricated, such as the chain case, luggage rack, or headset: clean, grease appropriately, and securely tighten all bolts, ideally performed by a professional workshop.
If there is too much oil in the hub after an oil change, wipe off the excess and continue to monitor the hub. Always follow the Rohloff guidelines and recommended oil change intervals.
The same procedure applies if the wheel or hub has been laid on its side (for example during transport), which can sometimes cause excess oil to appear even weeks after the transport. Wipe off the surplus oil and keep observing, while adhering to Rohloff instructions and maintenance intervals.
Especially in summer, at high temperatures, a thin film of oil on the hub may appear. This is not a technical problem. Simply wipe off the oil with a soft cloth and follow the Rohloff guidelines.
If the quick-release axle is overtightened, slightly loosen it. If the shift cables have too little slack, adjust them accordingly. For any gearbox-related issues, contact a Rohloff or idworx dealer.